Why You Should Use an External SMTP Server #
Using an external SMTP server to send your emails is highly recommended. It improves your email deliverability, increases your sender reputation, and reduces the chances of your emails landing in the recipient’s spam folder. Many shared hosting email servers aren’t as reliable, so by configuring an external SMTP, you ensure better reliability and security for your emails.
If you have an SMTP plugin already running, you do not need to adjust the SMTP settings in our Send Users Email plugin. It will simply use the settings you already have configured. If you have no SMTP plugin installed, please follow these steps, to send your emails via SMTP.
Which SMTP providers you should use #
You can use various providers to configure your SMTP server. Some common options include:
- Your Hosting Provider’s SMTP Server: Many hosting companies provide SMTP settings with their hosting packages.
- Gmail SMTP: You can use Gmail’s SMTP server if you’re sending emails from a Google account.
- External Services: External email services like Mailgun, Brevo (formerly Sendinblue), and others offer professional email-sending services that you can integrate with SMTP.
Below are the steps to obtain SMTP credentials from various providers and how to configure them in your WordPress plugin:
SMTP Credentials from Your Own Hosting Provider #
To use your hosting provider’s SMTP server:
- Log into your hosting account and locate the email or SMTP settings.
- Copy the SMTP Host, SMTP Port, Username, and Password provided by your host.
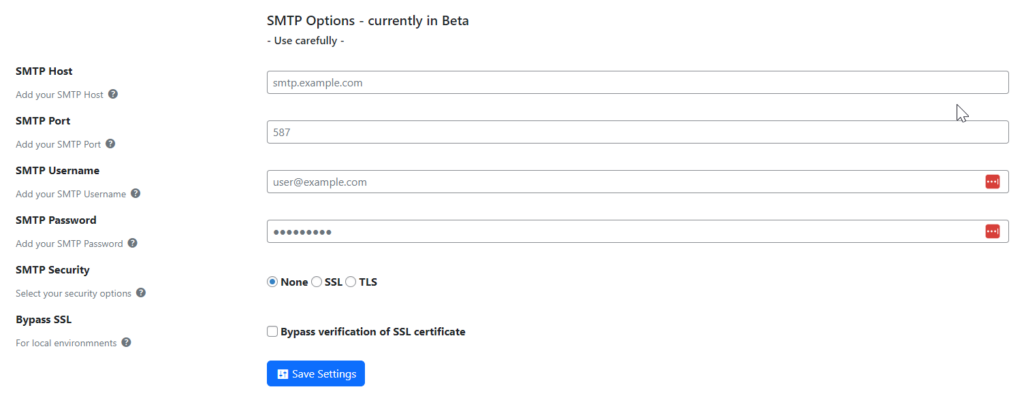
- In your plugin’s SMTP settings (as shown in the screenshot), enter these credentials.
- Select the appropriate security type (SSL/TLS) based on the instructions provided by your hosting provider.
- If required, check the “Bypass SSL” option for development environments or specific hosting configurations.
Note: Some hosting providers may have restrictions on email-sending limits. If you’re sending large volumes of emails, consider using an external service.
SMTP Credentials from Gmail #
To use Gmail’s SMTP server:
- Open your Gmail account and navigate to Google Account settings.
- Enable Less Secure Apps or generate an App Password (if you have 2-factor authentication enabled).
- In your plugin’s SMTP settings, enter:
- SMTP Host:
smtp.gmail.com - SMTP Port:
587for TLS or465for SSL - SMTP Username: Your full Gmail address (e.g., user@gmail.com)
- SMTP Password: Your Gmail password or App Password (if using 2-factor authentication)
- SMTP Host:
- Select TLS as the SMTP security option for Port 587 or SSL for Port 465.
- Leave the “Bypass SSL” option unchecked.
SMTP Credentials from Brevo (formerly Sendinblue) #
To use Brevo’s SMTP service, follow these steps. You can find more detailed information on their website.
- Sign up for an account at Brevo if you don’t have one.
- In the Brevo dashboard, navigate to SMTP & API under the settings menu.
- Generate and copy your SMTP Host, SMTP Port, Username, and Password.
- In your plugin’s SMTP settings, enter these credentials.
- Use the following default SMTP settings:
- SMTP Host:
smtp-relay.sendinblue.com - SMTP Port:
587(for TLS) - SMTP Username: Your Brevo account login
- SMTP Password: The SMTP password from your Brevo account
- SMTP Host:
- Select TLS as the SMTP security option.
- Save the settings.
SMTP Credentials from Mailgun #
To use Mailgun’s SMTP service, follow theese steps. You can find more detailed information here.
- Sign up at Mailgun and verify your domain.
- In the Mailgun dashboard, navigate to Sending > Domain Settings > SMTP Credentials.
- Copy your SMTP Host, SMTP Port, Username, and Password.
- In your plugin’s SMTP settings, enter the credentials:
- SMTP Host:
smtp.mailgun.org - SMTP Port:
587(for TLS) - SMTP Username: Typically your domain or API key, depending on Mailgun’s settings
- SMTP Password: Your Mailgun SMTP password
- SMTP Host:
- Select TLS as the SMTP security option.
- Save your settings.
Final Steps #
After entering the correct credentials for your SMTP provider:
- Test the configuration by sending a test email.
- Monitor the logs to ensure that emails are being sent successfully.
- Check the “Email & Error log” section of our plugin
- Adjust any settings like Bypass SSL or security options depending on your server environment.
When to use “Bypass SSL” #
The “Bypass SSL” option allows you to skip the SSL certificate verification when connecting to your SMTP server. This option should be used with caution, as it reduces the security of your email connection.
Here are scenarios when you might need to use it:
- Local Development Environments:
When working in a local development environment where SSL certificates might not be properly configured or trusted, you can enable “Bypass SSL” to send test emails without SSL validation issues. - Self-Signed Certificates:
If your SMTP server uses a self-signed SSL certificate (often the case with internal or private servers), the certificate might not be recognized as valid by your system. You can use “Bypass SSL” to avoid connection problems due to untrusted certificates. - Non-Critical or Testing Use Cases:
If email security isn’t critical (e.g., during testing or on internal systems) and you are confident about the safety of the network, bypassing SSL can help avoid issues related to certificate validation.
By following these steps, you can ensure your WordPress site sends reliable and secure emails to your users, via the Send Users Email Plugin for WordPress.
When Not to Use “Bypass SSL” #
The “Bypass SSL” option allows you to skip the SSL certificate verification when connecting to your SMTP server. You can use this option when you are working in a localhost environment where SSL certificates might not be properly configured or trusted.
This is useful during local development and testing, where strict SSL certificate verification isn’t necessary. However, once your site is live or on a public server, it’s important to disable this option and use proper SSL/TLS verification to ensure secure email communications.